OWI RocKit Robot
In this page, I will describe how you can get started in robotics either using commercial kits or building your own robot and/or microcontroller-based electronics circuits from scratch.
There are several commercial kits that can introduce you to robotics. In this page, I will describe products offered by three companies which use different learning approach: OWI, LEGO and Parallax.
OWI sells kits that allow the construction of toy robots. These robots are in general fairly cheap and easy to build. There are different categories of products each with a different level of difficulty. Some of categories do not require soldering. These robots are ideal for kids under ten and those of us who want to build something quick and easy.
OWI RocKit Robot
Here is a short description of some of these robots:
Although technically very sound, these robots are limited as far as learning is concerned.
Another approach is to explore robotics with the LEGO MindStorms sets. The LEGO MindStorms product line was developed by MIT scientists. The base set can be purchased for around 300$CAN.
Robotics Invention System
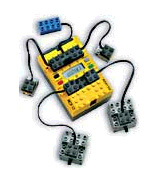
The LEGO MindStorms Robotics Invention System contains a control module (called the RCX brick) used to control the motors and sensors that can be hooked to a computer, a programming environment, two motors, gears, two touch sensors, one light sensor and several LEGO blocks.
|
|
|
|
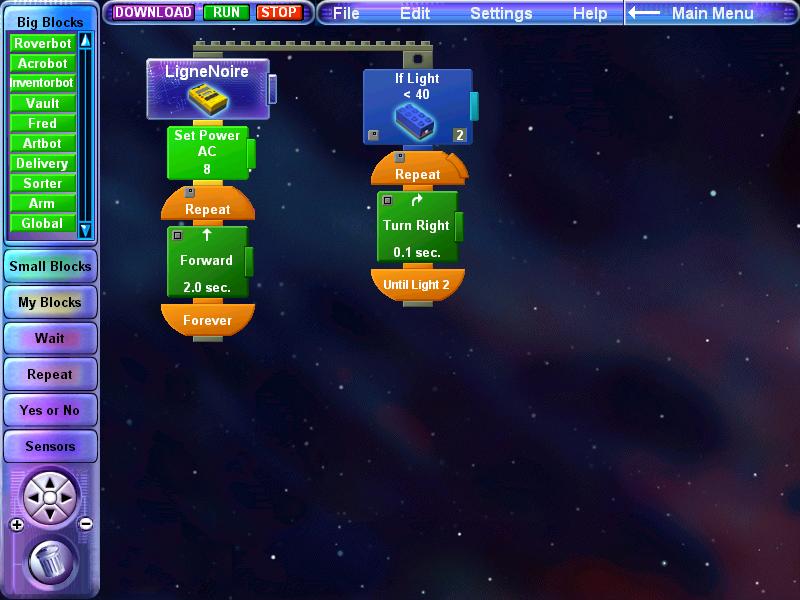
Don't get fooled by its look. Even though this LEGO set looks very much toylike, it can be used to build very complex robots. One of the rtl group members in Toronto used the LEGO MindStorms to build a photocopier! I have been very impressed by the overall quality of this set. It comes with a good variety of blocks, connectors, gears and wheels that can be used to make very diverse robots. The set even contains some decorative pieces. This kit is strong in mechanical aspects of robots. It introduces sensor control and programming. The LEGO MindStorms set comes with a tutorial that shows the basics of robotics programming. The tutorial shows step-by-step how to use the programming environment to build programs that can be downloaded via an infrared (IR) link to the RCX brick. Up to five programs can reside on the RCX brick at any given time. The tutorial shows how to connect sensors and motors to the brick, how to program sequence of movements, how to use sensors to change the behavior of the robot, etc. The programming environment is quite easy to use, yet it is very powerful. The picture below shows a program that allows a robot to follow a circular black line.
The instruction book that comes with the MindStorms kit shows how to build different types of robot (robot on wheels, robot on tracks, walking robot, robot with moving arms/eyes, etc.). It also shows how to build basic structures (whiskers, bumpers, etc.).
There are also several books and Web sites dedicated to MindStorms and it is possible to find tons of information on the use of LEGO for robotics. There are also discussions on how to extend the set (custom built sensors, Not Quite C programming language, etc.).
LEGO MindStorms set does not require electronics understanding, but neither will teach it. If your main goal is to learn electronics, this is not the kit for you. However, if you want to build cool robots without the hassle of soldering, this is an excellent choice.
Parallax kits have been designed for the high school science curriculum. Target age group is 15 to 18 years. This robotics curriculum is easy to understand and quite complete. It is available on-line on the Parallax Web site at Downloads of Educational Curriculum page. Worth a look.
The curriculum is built around the Board of Education (BoE) which is a control board with a microcontroller, all the required circuitry and a small prototype breadboard that can be used for electronics and robotics experiments. The microcontroller on the BoE is the BASIC Stamp. The BASIC Stamp can be programmed on a PC using an extended version of the BASIC language. The programs are downloaded to the BASIC Stamp through a PC serial port. Parallax curriculum covers the following topics: What's a microcontroller?, Robotics!, Earth Measurements, Industrial Control, Basic Analog and Digital and StampWorks).

Boe-Bot
It is possible to purchase BASIC Stamp build-it-yourself control boards from Parallax. Another board that has similar characteristics to the BASIC Stamp is the OOPic from Savage Innovations.
OOPic
Overall, I would say that it is easier to build different types of robots and explore the mechanics apsects of robotics with the LEGO MindStorms set. But the Parallax kits is better suited to learn electronics fundamentals. Both LEGO and BoE provide enough material to learn programming.
Building robots with robotics sets is the easiest way to get started in robotics. However, this approach has some limits. If you plan to build several robots or homegrown projects (and want to keep them around after you have built them), using kits can become very expensive. I will now introduce the steps that are required to build your own robot.
In the present section, I will describe the steps that are required to build a robot from scratch. This method is the cheapest one (at least long term - because the start up costs are not to neglect). Building your own robot allows you to customized your design to the task at hand. This method is obviously more time consuming and requires (and exercises) a lot of patience!
In the following text, I will try to describe techniques that will reduce the costs of your projects (building your own programmer, using public domain programming tools and environments including interpreters and compilers).
There are three areas to tackle when you build a robot:
In the present page, I will focus mostly on what I know best, i.e. the programming aspects. I will also try to cover the basics of electronics, at least enough to get started.
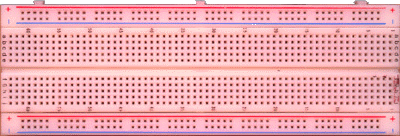
For those of you who are starting in this field, I recommend testing your circuits for the first time on prototype breadboards (see Figure). It is possible to find such breadboard in an electronics component store. The use of breadboards allows you to design a circuit quickly since you don't have to go through the pains of soldering. Some builders even integrate their breadboard directly on their robot!
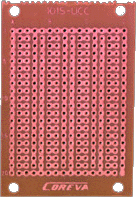
Once the circuit and tested, it is possible to implement it on a circuit board. You can use generic circuit boards such as the one shown on the Figure below or you can build your own PCB. Then, you solder the components and wires on the circuit board.
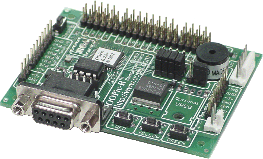
It is also possible to design its own electronic circuit schematics with a CAD program and send the resulting file to a board manufacturer to get it done. The following image shows the IGORE board created by Aaron Ramsey with the EAGLE software and manufactured by Olimex.
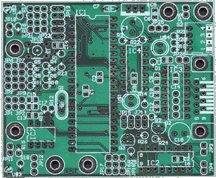
IGORE Board
You require the following things in order to build your first control board:
In addition, if you are using a compiler and/or an assembler, you might want to flash a bootloader on your microcontroller in order to allow the ability to download programs over the serial port (see details below).
I recommend the PIC16F877. It has a good number of I/O pins, can run at 20 MHz, uses a 8 Kb flash memory, has two PWM channels and supports a host of interfaces (RS232, I2C, SPI, etc.) and it is cheap! Other popular microcontrollers are the Atmel AVR, the 8051 and the Motorolla HC11/12.
Nowadays, several microcontrollers have on board flash memory to store their programs. Flash memory is a type of non-volatile memory, that is, once in flash memory, the program stays there even if power is turned off. Flash programmers are used to write programs on microcontrollers' flash memory. The programs stored on the microcontroller flash memory are launched on system reset.
There are different types of programmers. Some programmers will allow you to program microcontrollers from different vendors. Programmer's functionality may be intimidating at first, but is in fact fairly simple. Take for instance flash memory based PIC microcontrollers. To erase the content of the memory, a programmer needs to apply a voltage of approximately 13V on one of the pins of the chip. Then, the programmer varies the voltage on some specific pins of the microcontroller to transfer the program instructions in binary form at the appropriate memory addresses. A PIC programmer can easily be extended to support microcontrollers with different pin factor (18, 28, 40 pins, etc.).
It is possible to buy a commercial programmer. The cost will be around 150$CAN. EPIC programmers are affordable. It is also possible to build your own programmer for next to nothing. There are two kinds of programmers: those that use the parallel port to program and those that use the serial port.
I like JDM type programmer because it uses the serial port to program PIC microcontrollers (you are more likely to have an extra serial port lying around on your PC). The plans for this programmer can be found at JDM PIC Programmer Web page. The plan presented on this page is specific to the 16F84 but it is easy to extend to other PIC (PIC16F876, PIC16F877, etc.) by extending the wires to 28 and 40 pins connectors. For instance, one would connect pin 4 (MCLR) of the 16F84 connector to the corresponding pin 1 of the PIC16F877 connector. Important pins to extend are: Vdd, Vss, MCLR, RB6 and RB7.
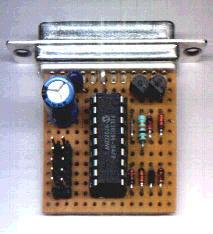
JDM Programmer
One of JDM programmer advantage is that you don't require to provide power to the circuit with an external adpater because the programmer draws power directly from the serial port. Note that depending on your PC model, you may need to add such adapter. I don't on my PC, but I do need one to program PIC18F chips on my notebook.
For Atmel AVRs, you can find plans to build your own programmer on Peter Fleury's Web site. AVR programmer is simpler to build than the PIC programmer.
Once you have a programmer, you need to find the software that is compatible with it. If you bought a commercial programmer, then it most likely comes with the appropriate software. If you have a homegrown programmer, you will need to find the appropriate software. For JDM programmer, I recommend IC-Prog (freeware). IC-Prog can be used to program several types of microcontrollers.
Another programmer application is PonyProg. It supports PIC and Atmel microcontrollers (and a number of other ones).
To generate programs that can run on a microcontroller, you will need to get a development environment. There are many possibilities. I recommend the use of a BASIC interpreter or compiler for beginners. For those familiar with C, there are several C compilers available. Use of assembly language is also possible (and sometimes the only option if your microcontroller has a small memory), but is not recommended for beginners as the learning curve is steeper.
If you want to use BASIC, there are at least two options for PIC microcontrollers: use the commercial compiler PicBasic or use the freeware BASIC interpreter PicPuter. In the case of PicPuter, you will need to first burn the interpreter on your microcontroller. Then, the programs can be interactively entered using the interpreter shell using a serial connection. A simple terminal program, like HyperTerminal, can be used to communicate to the chip. The advantage in this case is that you don't need to install any software on your PC. Instructions are stored directly in flash or can be immediately executed. It is thus possible to interactively stimulate the peripherals and is a great way to test your board. I really like this interpreter.
For PIC microcontrollers, it is possible to download the MPLAB IDE from Microchip. This development environment contains a project manager, a text editor, an assembler and allows to add hooks to invoke third-party compilers and programmers. This environment, makes it possible to write firmware for all models of PIC microcontrollers, but only assembly language is supported in the base package. Using assembly language is not recommended for beginners.
I know two C compilers for PIC microcontrollers: CCS and MPLAB XC compiler. CCS is affordable and has a good library of routines to interface with different device types. The MPLAB XC compiler is recommended for industrial use and free to use. A public domain compiler named SDCC has been ported for the PIC, but it is still under development and would be recommended at this point only for those who have experience with compilers.
For Atmel AVR microcontrollers, a public domain compiler named avr-gcc is available free of charge. For Motorola 68HC11/12 microcontrollers, the same set of tools is available on the gnu-m68hc11 Web site. For Atmel and 68HC11/12, the ImageCraft commercial C compiler is very popular.
To be able to reprogram a microcontroller, it needs to be pulled out of its socket on the circuit board, inserted into the flash programmer socket and then the new program needs to be "burnt" on the chip. This set of operations is time consuming and bound to break pins in the long run.
For those microcontrollers that have a good amount of flash memory (four kilobytes and over), it is possible to load a special program, called a bootloader, in the microcontroller's memory in order to provide means to download program to the chip using the serial port. This way, it is possible to program the microcontroller on-line (i.e. you can program the chip while it is still in the circuit board). Once the bootloader is loaded on the microcontroller, there is no need for a programmer. Note that some microcontrollers have a bootloader built into the chip. This is the case for the Dallas Semiconductors DS89C420. The bootloader is programmed in its ROM. For these chips, there is no need for a programmer.
Last updated: Febrary 19, 2021